|
|||||||||||||||||
|
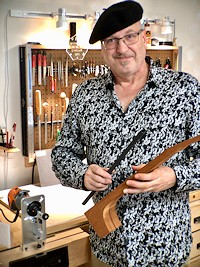
Christopher Cozad installs the Carbon Fiber D-Tube Neck Stiffener in a Guitar
Christopher began building acoustic guitars in the mid-1970s. His first memorable creation was something of an f-hole archtop, of which he recalls, "That guitar sounded a bit like plucking rubber bands stretched across a 2x4, utterly dissatisfying, but it looked great!" After a quarter century hiatus from guitar making devoted to software design and development which took him all over the world, Christopher returned to lutherie. In 2004 he set up a new climate-controlled workshop stocked with new tools and materials. As he puts it, "I began experimenting again, disassembling existing instruments to better understand how they worked, determined to improve upon the roundness of the wheel. I read all the available literature, all the definitive works on the acoustic guitar, studied with several well-regarded luthiers and set out in earnest to go beyond the usual, to build fine performance art, to create guitars that are as beautiful and interesting to look upon as they are wonderful to play." At the core of Christopher's philosophy is the need to "rigidify the underlying structure, the frame of the acoustic guitar". For this he relies on the carbon fiber ingenuity of JB Allred's DragonPlate line of products. Liberating the soundboard from its traditional role as the primary mitigator of collapse, and learning to control bridge rotation without heavy bracing, this guitar maker has focused on the sound-generating potential of the instrument. The results are a new breed of guitar whose voices speak for themselves. Today, Cozad Guitars produces a limited number of instruments for a select clientele from a shop located near Charlotte, NC. I have completely eliminated adjustable truss rods from my guitar builds.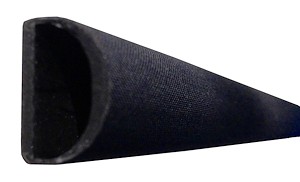 (Learn more about the History of the Truss Rod and the D-Tube Alternative at Cozad Guitars)
I accomplished this by using the DragonPlate® Carbon Fiber D-Tube Neck Beam™ ("D-Tube") from Allred and Associates, Inc., a carbon fiber structural component specifically designed for the purpose of replacing a truss rod altogether. I can attest that the D-Tube is up to the task. It has performed flawlessly for me. The first patented truss rod was intended to counter the pull of the strings by closing the distance between the fretboard and the now elevated string path, elevated as a direct result of the inability to construct a wooden neck having sufficient stiffness to resist the increased tension of the steel strings, introduced in 1900. In the application for that patent, filed in 1921, a benefit was identified, that being the ability to "... to use wood which has not been heretofore considered satisfactory for the manufacture of necks, on account of its not having sufficient strength and rigidity, and further, great care in selecting stock is not necessary." Wooden necks became slimmer and lighter, as the factor of neck stiffness, once a hallmark of lutherie as evidenced by centuries of the symbiosis between wooden necks and catgut strings, was summarily replaced with the newfound mechanical ability to force a neck, any neck into shape. Significant strides have been made since that point in guitar design history when the adjustable truss was introduced. Builders at that time didn't share in the wealth of knowledge we now possess regarding the design and construction of the guitar. Had they had access to the technology of carbon fiber, I think the truss rod story might have turned out differently. A truss rod is not necessary in my guitars. I build a stiffer neck, just like luthiers used to, back in the days before steel strings were introduced. The D-Tube necks I have built over the last 10+ years are installed dead flat. A set of medium gauge strings on a 25.5" scale will flex the necks on my guitars just enough to measure 0.08mm to 0.09mm of relief at the 6th fret (on a 14 fret board) while under string tension. I have never measured more than 0.1mm relief for the 12-string guitars I have built that are strung with Light gauge sets. None of my D-Tube necks have deformed. For those familiar with steel memory (SME), when the strings are loosened on any of my guitars built with D-Tube necks, the necks return to dead flat, the condition in which they were first constructed. If greater relief can be demonstrated to actually be necessary on the part of the player (as it was in only one of my guitars during that same period), it is easily formed into the surface of the fretboard prior to adding the fretwire. I have found the D-Tube to be very well-engineered for my purposes. I am able to consistently construct a lighter, stiffer, and more resonant neck for my acoustic guitars. For the acoustic guitar, the 3/4" wide D-Tube is available in both a straight or tapered profile. The straight profile is available in two lengths, 16" and 20", and measures 1/2" deep throughout its length. The tapered profile is 20" long. TIP: I prefer the 3/4" wide straight profile for my guitar necks. I rely on the 16" D-Tube for all tenon-based (dovetail or bolt-on) detachable necks. I use the 20" D-Tube for elevated necks and for Spanish Heel-style construction (non-detachable necks). The hollow beam weighs a mere 1.8 oz (0.05 kg). The well-known Martin-style adjustable truss rod weighs more than three times as much at a whopping 6.06 oz (0.17 kg). Comparatively, weight-wise, the D-Tube is practically non-existent! I position the D-Tube such that it extends fully onto the headstock, significantly increasing the strength of the weakest section of a guitar neck. The D-Tube complements all varieties of neck construction:
The D-Tube is designed to be the sole resident in your guitar neck. If you have been supplementing truss rods with twin, parallel carbon fiber stiffeners, you will be pleased to learn that the D-Tube replaces all three items.
The groove may be cut via CNC, milling machine, a router table, jigs and fixtures with a handheld router, or with hand tools. In addition to the D-Tube, a few supplies are necessary:
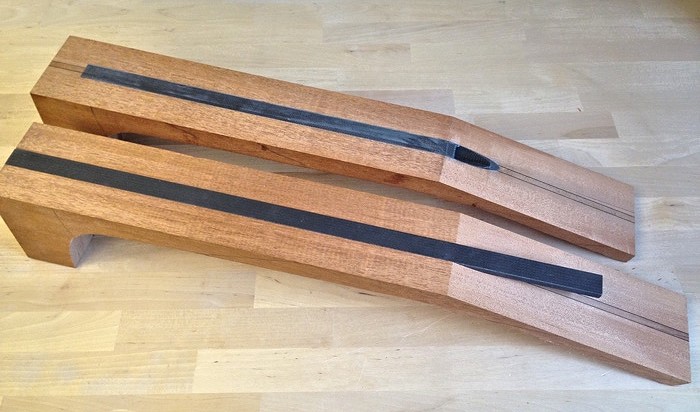
I rout a through groove from the headstock to the heel block using three (3) ever-deepening passes over the router bit. If desired, I could also choose to stop the groove short of the end. Notice the depth of the slot and the depth of the D-Tube; there is just enough room for the adhesive. Once the epoxy has cured, the D-Tube will (should) be perfectly flush with the surface of the neck. Because I routed a through-groove down the neck, I fashion a plug that will fill the void (the portion of the through-groove not filled by the carbon fiber), butting up squarely against the end of the D-Tube, a process which takes just a few extra minutes at the bandsaw and the disc sander. In lieu of making a custom plug, 3/4" hardwood dowel stock works great for this purpose. Alternatively, I can shape the end of the D-Tube to conform to the compound radius left by the stop dado, or I can choose to plug the end of the D-Tube and fill the small void with epoxy, if desired.
The groove gets coated with a thin layer of epoxy. The D-Tube is hollow and I don't want glue inside of it. Because I do not flood the groove with adhesive there is no need to plug the ends of the D-Tube. At the recommendation of the manufacturer, I am using 3M Scotch-Weld #2216 2-part epoxy. It has proven to be very effective. UPDATE: I have also had success with Superbond Epoxy 1:1 from Fiberglass Coatings. Note that both of these epoxies, the Scotch-Weld and the Superbond, are a paste format, versus a runny liquid format. To simplify cleanup, I would suggest applying tape (painter's, low-tack, etc) to the surface of the neck blank prior to adding the epoxy and gluing in the D-Tube. Two narrow strips, one down each side of the groove, or a single, wide strip whose center is removed with a razor knife will mitigate the need to aggressively remove any squeeze-out or hardened epoxy. Simply remove the tape once the epoxy has cured and be left with a clean surface. Why bother with tape, you may ask? I have no desire to re-establish my neck geometry, which can (would likely) be altered when attempting to sand off epoxy squeeze out. Your mileage may vary. Both the carbon fiber D-Tube and my custom wooden plug are pressed into place. I lay a piece of parchment paper over the neck and lightly apply a few small clamps, merely to prevent any shifting during cure. For any who may be unfamiliar with epoxy, unlike PolyVinyl Acetate (PVA) or Aliphatic Resin (AR) glues, it does not benefit from high-pressure clamping; in fact, heavy clamping is advised against. The neck is left overnight, giving the epoxy time to fully cure. After releasing the clamps and lifting off the parchment paper, I removed any accumulated, cured epoxy using a scraper. When setting the depth of cut for the groove, I had taken the time to ensure the D-Tube would sit just shy of the surface of the neck blank. I was rewarded as the scraper just kissed the surface of the carbon fiber as all the squeeze out was removed.
Cut-off wheels, such as the type used with rotary tools, have been my preference for cutting carbon fiber. Using a handheld rotary tool (Dremel), I am able to quickly remove most of the section of D-Tube that extends out over the headstock. Since this first installation I have switched to using diamond impregnated jig-saw blades for the task. Remaining material is sanded back nearly flush with the headstock (carbon fiber sands very readily). A disc (or belt) sander works well for this step. For final dressing of the face surfaces of the neck and headstock, I rely on strips of adhesive-backed sandpaper affixed to a dead-flat marble slab. A few careful strokes across that slab are all that are needed to complete this stage of the neck construction. Alternatively, I could saw the waste off and true it up with a sanding block. At this stage, it is critical to maintain the dimensions of the neck, so sand with caution. TIP: Protect your airways and eyes when machining carbon fiber! That includes any and all routing, sawing and sanding. I completed the neck in the same way I would have had I installed any other form of truss rod. With this neck I have now completely replaced the truss rod (or combination truss rod / carbon fiber stiffeners) with the DragonPlate Carbon Fiber D-Tube Neck Beam. The fretboard may be attached using your choice of adhesive, including Fish or Hide Glue, Titebond, or even epoxy. I have yet to experience adverse results with any of the above choices. My preference is to use a very thin application of epoxy to attach fretboards and, while fretboard removal (should it ever be necessary) may be a bit more difficult, there is absolutely no concern regarding obtaining a sufficient bond with the carbon fiber. FAQs Question: How do you adjust for relief to account for environmental conditions? Answer: I don't. Utilizing the D-Tube to increase the neck stiffness by several orders of magnitude, and building once again toward a symbiotic relationship between the stiffened neck and the strings under tension (just like luthiers used to, back in the days before steel strings were introduced), my guitar necks now express the slightest amount of forward bow, just the right amount of relief. My necks are not affected by environmental conditions, not anymore. They stay where they were installed! Question: With the D-Tube installed, what about neck flex (the expected forward bow of a flat neck when strings are applied)? Answer: A set of medium gauge strings on a 25.5" scale will flex the necks on my guitars just enough to measure 0.08mm to 0.09mm of relief at the 6th fret (on a 14 fret board) while under string tension. I have never measured more than 0.15mm relief for the 12-string guitars I have built that have been strung with Medium gauge sets. I typically use Light gauge sets on 12-strings, and relief is consistently 0.9 mm to 1.0 mm. UPDATE: After nearly 10 years there has been ZERO deflection in the plane of the neck built for this article. Question: Will a neck fitted with the carbon fiber D-Tube accommodate differing string tensions? Answer: A qualified "Yes", depending on your goals. I have consistent results with 6-string guitars using medium-gauge strings and below, and 12-string guitars using light-gauge strings. I have not had long-term experience with heavy-gauge strings, as I don't use them on my guitars. Question: Can you rely solely on a D-Tube in a 12-string neck? Answer: Absolutely, and I have done so! Question: Is an adjustable truss rod really necessary in an acoustic guitar? Answer: Not for me. Not anymore! Question: Is the D-Tube a viable alternative to a truss rod? Answer: Yes, absolutely! Using the D-Tube, I am convinced I can build a noticeably lighter, stiffer, more unified guitar neck which contributes to increased sustain and improved overall tone of my guitar. A D-tube neck is impressively lightweight! Equally impressive is it's rigidity when it is installed on the guitar; it does not move under string tension! For my purposes, that is a good thing, as it assures me that I retain complete control of any relief I may choose to build into my necks - or not. Even though the neck has been developed separately from the body, the overall feel of the instrument is more unified. IMPORTANT: I have not conducted sufficient scientific tests to unequivocally prove that the D-Tube increases sustain and/or improves the overall tone of my guitars; HOWEVER, I cannot otherwise account for the perceptible increase in sustain and improvement in the overall tone of my guitars - guitars in which the only factor that was altered was the replacement of the truss rod with a D-Tube! I believe I am building a more resonant neck using the carbon fiber D-Tube. Do you tap your soundboards? I also tap my D-Tube necks. The D-Tube plays an intrinsic and crucial role in my construction of durable, lightweight, responsive guitars having rich and vibrant tone. Thank you, DragonPlate! | |||||||||||||||||
| < Back | |||||||||||||||||
|
Home - Company - Contact - Soundpost Setter - Carbon Fiber Clamps - Reinforcements - D-Tube - Gemini & Luthiers - Projects - Terms
| |||||||||||||||||


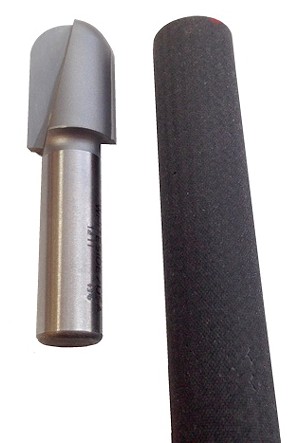 I use a router table, so I selected a 3/4" Whiteside #1411 3/8" radius round nose (Core Box) router bit that perfectly matches the half-round profile of the "D" shaped carbon fiber beam.
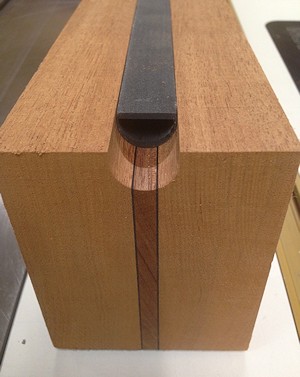 On the opposite end of the neck I choose to run the carbon fiber up into the headstock, rather than terminate the groove short of the point where the fretboard ends at the nut, as I would
with a truss rod slot. It has been a long time since I fashioned a neck without using some form of carbon fiber stiffener, and I have always extended those stiffeners into the headstock
area - especially critical for one-piece necks. Having witnessed a few cracked headstocks from other builders, I believe this crucial juncture of the neck benefits from the extra attention.
On the opposite end of the neck I choose to run the carbon fiber up into the headstock, rather than terminate the groove short of the point where the fretboard ends at the nut, as I would
with a truss rod slot. It has been a long time since I fashioned a neck without using some form of carbon fiber stiffener, and I have always extended those stiffeners into the headstock
area - especially critical for one-piece necks. Having witnessed a few cracked headstocks from other builders, I believe this crucial juncture of the neck benefits from the extra attention.