|
|||||||||||||||||
|
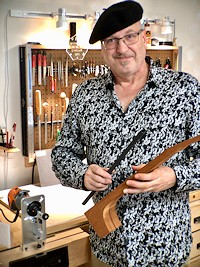
Christopher Cozad installs the Carbon Fiber D-Tube Neck Stiffener in a Guitar
Christopher began building acoustic guitars in the mid-1970s. His first memorable creation was something of an f-hole archtop, of which he recalls, "That guitar sounded a bit like plucking rubber bands stretched across a 2x4, utterly dissatisfying, but it looked great!" After more than a quarter century hiatus from guitar making devoted to software design and development which took him all over the world, Christopher returned to lutherie. In 2004 he set up a new climate-controlled workshop stocked with new tools and materials. As he puts it, "I began experimenting again, disassembling existing instruments to better understand how they worked, determined to improve the roundness of the wheel! I read all the available literature, all the definitive works on the acoustic guitar, studied with several well-regarded luthiers and set out in earnest to build the finest instruments I possibly could." Christopher attributes the most significant strides in his own journey as a guitar maker to personal interaction with other notable builders such as Kent Everett, John Greven, Tom Bills, Trevor Gore and more, who have been generous enough to share their hard-earned knowledge with him. In his quest to continue to craft what he calls, "fine performance art", Christopher has incorporated techniques and technology developed by and learned from experts in other disciplines, such as marquetry and joinery from David Marks, inlay techniques from Larry Robinson, the carbon fiber ingenuity of JB Allred, acoustic pickup technologies from James May and Rich Barbera, and many more. Today, Cozad Guitars produces a limited number of instruments for a select clientele from a shop located near Charlotte, NC. The Carbon Fiber D-Tube, a Truss Rod Alternative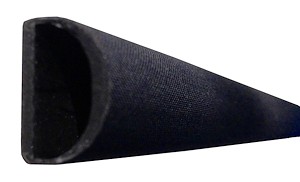 (The full article may be found at Cozad Guitars)
In todays steel string acoustic guitars, the truss rod is as common as the soundhole. But is a truss rod really necessary? What would happen if it were removed entirely and/or replaced with something else, such as carbon fiber? A six-string set of D'Addario EXP11 Light Gauge strings applies 159 lb (72 kg) of tension on a 25.5" scale length guitar. A light gauge twelve-string set from the same supplier (EXP36) is rated at nearly 242 lb (110 kg) of tension! Comparatively, non-steel string guitars exert much less tension on the neck, typically ranging from 75 to 100 lb (34 - 45 kg). With nothing but the wood of the neck to resist the pull of the strings, a wooden neck having no truss rod and under high steel string tension may simply continue to bow forward, eventually making the instrument un-playable, as the strings continue to elevate farther away from the fingerboard. The use of carbon fiber for stringed instrument neck reinforcement is now several decades old, and it is easy to understand why. The fact that carbon fiber often weighs less than the wood it replaces and is certainly many times stiffer and stronger can be reason enough to incorporate it. Many builders have chosen to supplement an adjustable truss rod with parallel bars of carbon fiber running the length of the neck. Relief refers to an ever-so-slight but deliberate forward bow in the neck. This can be desirable for reducing string buzz, especially for extremely low action setups, lower-than-concert pitch tuning(s), or in accommodating aggressive strummers. A builder may seek to mitigate against customer dissatisfaction by constructing a guitar that will handle any possible playing or setup scenario. Such an instrument will provide for adjustable relief by incorporating an adjustable truss rod (with or without carbon fiber stiffeners). At this point, for many, the discussion is over; an adjustable truss rod is a required component in an acoustic guitar. However, a growing contingent of builders and players have become convinced that these steel machines (metal square tubes, T-bars, I-beams, U-channels, single-action truss rods / compression rods, or dual / double / twin-action truss rods) inside their instrument necks are detrimental to both the playability and the sound of their guitars. They contend that the weight of the added steel does not make for an optimally balanced neck, and the metal fixture has a negative impact on the overall tone. The truss rod cannot simply be removed, as the need to counter the pull of the strings remains. If one believes neck relief to be essential for optimal playability, it can be readily introduced into the neck design. Long before the advent of carbon fiber, guitars were constructed using fixed necks, having pre-set neck relief, so this is not a new thing. Today, when I ask if an acoustic guitar needs to have an adjustable truss rod, I am really asking if it is absolutely necessary to be able to adjust neck relief. Q: In real world scenarios, how much relief is actually introduced by an adjustable truss rod?
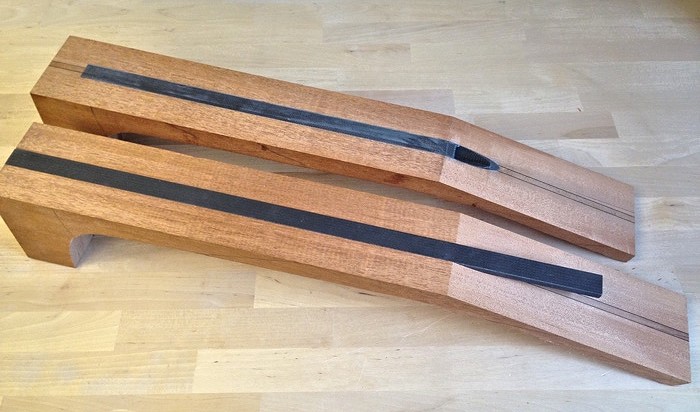
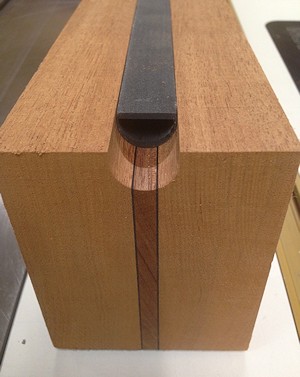
Dragonplate D-Tube Neck Beam Along with my own subjective experience, I had obtained sufficient anecdotal evidence regarding neck stiffness and carbon fiber to purge a neck of a truss rod altogether. I selected the Dragonplate D-Tube Neck Beam, a $75 carbon fiber structural component specifically designed for the task. This 16" hollow beam weighs a mere 1.8 oz (0.05 kg). The well-known Martin-style adjustable truss rod weighs more than three times as much at a whopping 6.06 oz (0.17 kg). Comparatively, weight-wise, the D-Tube is practically non-existent! There are multiple versions of this product available, but I chose to use a straight tube 3/4" wide x 1/2" high x 16" long, as the groove I would have to cut into the neck, being of equal depth throughout, would be straightforward to rout. The groove may be cut via CNC, milling machine, a router table, jigs and fixtures with a handheld router, or with hand tools. Neck design is of little consequence when considering the installation of a D-Tube. Whether a neck is laminated or solid wood, the headstock is one piece with the neck or attached via a scarf joint, the neck to body attachment is glued dovetail, bolt-on mortise-and-tenon, butt-joint loose tenon, or even an integrated Spanish heel; all are able to receive this truss rod replacement. In a truss rod plus 2 carbon fiber stiffeners approach, I would have approximately $50 invested in materials. The Dragonplate D-Tube Neck Beam replaces all three items. The only difference between constructing a neck with a D-Tube and constructing a neck with truss rod is in the number and size(s) of the groove(s). The D-Tube requires that I rout a single groove into the surface of the neck and epoxy in the Neck Beam, as opposed to routing three slots, one for the truss rod and the remaining two for carbon fiber stiffeners.
It is necessary to rout a 3/4" wide by 1/2" deep groove / channel down the center of the face of the neck (the side to which the fingerboard will be attached). I choose to keep the D-Tube flush with the face of the neck blank, as opposed to recessing it. At 1/2" deep, this material will sit very close to the back of my finished neck at the headstock end, so I want all the clearance that can be afforded me. I opt to rout a through groove from the headstock to the heel block, as opposed to a stop dado, which I accomplish in three (3) ever-deepening passes over the router bit. The groove is cut slightly deeper than the height of the D-Tube to accommodate a thin layer of adhesive. Once the epoxy has cured and the surface is trued-up again, the D-Tube will (should) be perfectly flush. I want 100% contact of neck material to carbon fiber at all points. As an alternative to stopping the 16" D-Tube short of the dovetail tenon end of the neck, I can use a longer 20" D-Tube that runs the full length of the neck with material to spare. This can project out onto a dovetail or tenon, or across a raised fingerboard's extension. Note that I have run the carbon fiber up into the headstock, rather than terminate the groove short of the point where the fingerboard ends at the nut, as I would with a truss rod slot. It has been a long time since I fashioned a neck without using some form of carbon fiber stiffener, and I have always extended those stiffeners into the headstock area. Having witnessed a few cracked headstocks from other builders, I believe this crucial juncture of the neck benefits from the extra attention. As others have rightly pointed out, be aware of the dimensions of the D-Tube, the slot in which it resides, and the target thickness of your finished neck.
Note that a debate still exists regarding whether or not to add a filler strip of wood above the carbon fiber. The contingent adding the filler suggest that a (micro-thin) wood strip, applied over the carbon fiber and secured with epoxy, will somehow provide a superior glueing surface for the soundboard. Technically, the argument rests on the adhesion capacity of the glues and materials in use, in conjunction with the concerns over delamination. I have successfully bonded fingerboards to neck blanks containing carbon fiber stiffeners using protein-based glues (Fish and Hide Glue) for some time, now, with no adverse results. These fingerboards can be heated and removed. I have also used epoxy to attach fingerboards and, while fingerboard removal can be tougher, there is zero concern regarding obtaining a sufficient bond with the carbon fiber. Perhaps a greater concern when considering adding a filler strip is the fact that the groove cut for the D-Tube is already 1/2" deep. Be aware that increasing the depth of that groove in order to allow for a thin veneer on top of the carbon fiber could potentially compromise the overall thickness of the neck (The manufacturer offers both a smaller, straight version along with a tapered version that may be used if neck thickness becomes an issue). After releasing the clamps and lifting off the parchment paper I removed any accumulated, cured epoxy using a scraper. When setting the depth of cut for the groove, I had taken the time to ensure the D-Tube would sit just shy of the surface of the neck blank. I was rewarded as the scraper just kissed the surface of the carbon fiber as all the squeeze out was removed. To protect neck geometry and to simplify cleanup, I would suggest applying low tack tape to the surface of the neck blank prior to adding the epoxy. Two narrow strips, one down each side of the groove, or a single, wide strip whose center is removed with a razor knife will mitigate against having to aggressively remove any squeeze-out, later. The section of D-Tube that extends out over the headstock gets sanded back nearly flush at the disc sander. For final dressing of the face surfaces of the neck and headstock, I rely on strips of adhesive-backed sandpaper affixed to a dead-flat marble slab. A few careful strokes across that slab are all that are needed to complete this stage of the neck construction. (I could also saw the waste off and true it up with a sanding block - Tip: Wear a mask when machining carbon fiber!)
Once completed, this neck is impressively lightweight. Equally impressive is it's rigidity when it is installed on the guitar; it does not move under string tension! For my purposes, that is a good thing, as it assures me that I retain complete control of any relief I may choose to build into my necks. Even though the neck has been developed separately from the body, the overall feel of the instrument is more unified, closer to that of a guitar constructed having a Spanish heel. My guitars are already light, as I incorporate carbon fiber in other components. The only metal on my instruments, apart from the strings, is found in the tuning machines. Responsiveness and sustain is much more noticeable than with the average acoustic guitar. Though I have not yet measured it, I believe the addition of the carbon fiber D-tube may have actually increased that sustain! At the outset of this article, I asked two questions about truss rods that I believe I can now answer: Q: Is a truss rod really necessary?Thank you, Dragonplate! | |||||||||||||||||
| < Back | |||||||||||||||||
|
Home - Company - Contact - Soundpost Setter - Carbon Fiber Clamps - Reinforcements - D-Tube - Gemini & Luthiers - Projects - Terms
| |||||||||||||||||


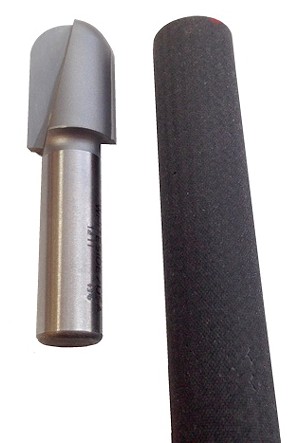 I use a 3/4" wide Whiteside 1411 3/8" radius round nose (Core Box) router bit that perfectly matches the half-round profile of the "D" shaped carbon fiber beam.
 The groove gets coated with a thin layer epoxy. The D-Tube is hollow but I have no need to plug the ends, as I do not flood the application with adhesive. I use the same 3M Scotch-Weld 2216 2-part epoxy that I use for all my significant carbon fiber-to-wood bondings. I lay a piece of parchment paper over the neck and lightly apply a few small clamps, merely to prevent any shifting during cure. Epoxy, unlike PVA or AR glue, does not benefit from high-pressure clamping; in fact, heavy clamping is advised against. The neck is left to dry overnight.